Electricity is all around us, so we tend to take it for granted. It’s a fascinating subject for kids, though, so they’ll love these electricity science experiments and activities. You may need to invest in a few simple supplies for some of these activities, but you’ll be able to reuse them for multiple activities year after year. The hands-on experience kids will get makes the extra effort worthwhile.
Static Electricity Experiments
Static electricity is an imbalance of electric charges on the surface of an object, resulting in a buildup of electrical charge at rest. It is most commonly generated when two different materials are rubbed together, causing electrons to transfer from one material to the other. This imbalance is what creates the “shock” you feel, for example, when touching a metal doorknob after walking on carpet.
First, a few ways to generate static electricity:
- Rub a balloon in your hair to charge the balloon
- Run a plastic comb through dry hair several times to charge the comb
- Take a plastic ruler and wrap a piece of wool or silk around it and rub up and down the ruler several times to charge the ruler
- Rub your socks against carpet
- Rub fur against plastic wrap or balloons
1. Start with an anchor chart
Static electricity is usually the way to introduce the concept, and it leads nicely into electrical energy and circuitry. Create a colorful anchor chart that lays out the basics of how it works. Some concepts to include: Opposite charges attract, positive charges move toward negative charges, etc. Add words and illustrations to make the concepts stand out.
2. Bend water with static electricity
Most static electricity experiments are quick and easy enough for anyone to try at home. This is a great example: Charge a comb by rubbing it against your head for a few seconds. Then, turn a faucet on to a low flow. Position the balloon close to, but not touching the water and watch the effects of static electricity as the stream “bends” toward the balloon.
3. Separate salt and pepper using a magic spoon
Pour a generous sprinkle of salt onto a piece of black paper. Then top it off with a pile of pepper. Rub a plastic spoon on your hair for a few seconds then hold the “bowl” of the spoon close to the top of the mound. The pepper will magically hop up to adhere to the spoon! This static electricity experiment works because pepper is lighter than salt, which makes it quicker to jump to the electrically charged plastic spoon. So cool!
4. Move a bubble using a balloon
Pour some bubble solution onto a glass or plastic surface then use a straw to blow a big bubble onto the surface. Next, hover a charged balloon over the bubble and slowly move the balloon across the surface. Since the soapy water is attracted to the charged object, the bubble will follow along with the balloon.
5. Swinging balloon
Blow up a balloon and attach a string. Hang the balloon from a doorway or low part of the ceiling. Now rub the balloon with a piece of fur to positively charge it. Hold your hand next to the balloon and watch as the balloon moves to meet your hand. Try it with different objects like a spoon or a wooden ruler. You may need to “recharge” the balloon after a few tries.
6. Flap a (paper) butterfly’s wings
The first step in this experiment is to create a paper butterfly. Cut out an outline of butterfly wings from colored tissue paper and set it on top of a square of cardboard. Do not glue it down. Now, cut a butterfly body (sort of in the shape of a peanut) from cardstock. Glue the body down on top of the middle of your butterfly, with the bottom and top overlapping onto the cardboard. Add googly eyes and antennae if you’d like. The tissue paper wings should extend loosely from the body of the butterfly.
Now the fun part. Take a charged balloon and wave it slowly, approximately one inch, above the butterfly. As you move the balloon, the butterfly’s wings will gently sway from side to side.
7. Take a can for a roll
Take a clean, dry aluminum can (such as a soda can) and lay it on its side. Now, charge a balloon on your hair and hold it next to one side of the can. The can should start rolling. Set up a few stations and let students have a contest to see whose can rolls furthest or whose can reaches the finish line first.
8. Make jumping goop with static electricity
Believe it or not, static electricity will also work on non-solid objects. Kick your static electricity experiments up a notch by mixing a batch of cornstarch “goop,” otherwise known as Ooblek. Then, use a charged balloon to make the goop “jump”.
9. Test different materials for static electricity
Some materials are affected by static electricity more than others. Give your students a variety of items to test with a charged item and see which ones stick.
What you’ll need: Balloon or charged plastic comb, large supply of lightweight items (tissue, paper feathers, foil, etc.)
Instructions: Divide students into pairs and give each pair a comb or a balloon. Have them charge their item. Then experiment holding charged item over different objects, seeing what moves and what doesn’t. To make the process more scientific, hand out a worksheet for the students to list the items, make a prediction for each one and mark the results.
10. Test cereals for static electricity
Kids will get on board with this fun challenge involving static electricity and different kinds of cereal.
*What you’ll need: balloons, 3 different kinds of cereal: Fruit Loops, Raisin Bran and Fruity Pebbles
Instructions: Set plates of the different cereals out. Now, charge the balloon on your hair. One at a time, hold the charged balloon over each plate. See which cereals move, which cereals hop up to the balloon and which cereals actually stick to the balloon. Ask your students these questions and see what they come up with. Was it electrons and protons that anything to do with this? Did the weight of each cereal have something to do with it? Finally, did the sugar content of each cereal have anything to do with it? Discuss their responses together as a class.
11. Make tiny foam balls jump
*What you’ll need: packets of mini styrofoam balls (also found at Target, Michaels, Walmart, etc.), clear plastic bottle, metal funnel
Instructions: Insert the funnel into the mouth of the bottle. Now, transfer some of the mini foam balls into the bottle and screw on the cap. Rub a feather duster or piece of fur all around the exterior of the bottle to charge the balls inside. Next, charge a balloon and run it along the outside. Watch the balls dance around like crazy!
12. Watch an octopus wriggle
This is a fun experiment to watch what happens when two charged surfaces are put together.
*What you’ll need: paper cups, plastic sheet like newspaper bag or plastic wrap, scissors, tape, faux fur or wool socks, balloon
Instructions: Measure the circumference of the paper cup. Now cut a section of plastic wrap the same length. Cut 8 slits from one end of the plastic to about one inch from the top. The result will look like a section of fringe. Tape the fringe to the inside of the cup. These will be the octopus’s tentacles. Draw eyes and a big smile on the cup for the octopus’s face. Next, charge the fringe by rubbing a piece of faux fur or a wool sock against it. Then, charge a balloon in the same manner. Bring the balloon next to the octopus’s tentacles. You’ll notice they move away from the balloon. That is because both objects are positively charged.

Electric Circuit Experiments
13. Model a human circuit chain
This is an easy way to introduce the concept of a circuit. Ask for 5-6 volunteers to demonstrate. Have the students stand in a line and hold hands. Give a buzzer to one of the students. Next, starting at the opposite end of the line, have the students pass a hand squeeze from the start of the line until it reaches the student with the buzzer. When the last student receives the squeeze they press the buzzer. This activity is super helpful to demonstrate a conductive path.
14. Go on an electricity scavenger hunt
This activity requires no materials, but raises awareness of electricity in our everyday environment. Have students pair up or form small groups, set a timer, then have them search the classroom for evidence of electricity— switches, wires, outlets, lights, batteries in devices, etc. The team with the most items at the end of the time limit wins.
15. Explore closed vs. open circuits
A closed circuit is a complete, uninterrupted path that allows electric current to flow, while an open circuit has a break in the path, preventing current from flowing. Here is a fun activity that lets kids explore the difference.
*What you’ll need: Aluminum foil strips (approximately 8-10 inches long and 1 inch wide), coin cell batteries and LED light bulbs
Instructions: Students break into groups of 4 or 5 gathered around a common desk or table. Pass foil strips out to each group. Have them lay the strips on a desk end to end to form a long straight “path.” This foil path represents the “road” electricity would travel along in a closed circuit. Make sure each foil strip touches the next one at their ends. Next, have students place the battery at one end of the foil path and touch the LED legs to the other end. If the path is constructed correctly, the bulb will light up. Give students time to experiment. Try creating a gap in one of the foil connections and see what happens. Try different pathways- a zigzag, a circular pattern, etc. Have students record their results then gather as a class to discuss.
16. Assemble circuits from play dough
Once your students are ready to explore electrical energy, start with play dough circuits.
*What you’ll need: battery box and clear mini LED lights (individual lights, not a strand).
Instructions: Begin by forming two balls of play dough. Attach the positive wire from the battery pack into one of the balls and the negative wire into the other. You will notice that the LED lights have two wires protruding from the light bulb, one longer and one shorter. To assemble your circuit, insert the long wire of the LED light into the ball of dough with the positive wire from the battery pack. Insert the short wire of the LED light into the ball of dough with the negative wire from the battery pack. Once the wires are inserted properly, the light bulb will illuminate. If the two balls of play dough touch, a short circuit will occur and the light will go off.
17. Build multiple circuits with play dough
Try the experiment above using multiple balls of play dough in a line, a wavy line or in a circle. Play with arranging the positive and negative legs of the LED to see how to form a complete circuit. Give students plenty of time to explore.
18. Find out if water conducts electricity
We’re always telling kids to get out of the water at the first sign of a lightning storm, so use this controlled experiment to help them understand why.
*What you’ll need: alligator clip wires, mini LED bulbs (diodes), *9 volt battery, *glass of tap water
Instructions: To begin, attach one end of the alligator clip to the positive terminal of the battery. Attach one alligator clip wire to the other end of the battery clip. This will be the positive end of your circuit. Now, attach the free end of the positive alligator clip wire to the positive side of the LED light (the end with the longer leg). Nest. connect the other alligator clip wire to the negative terminal of the battery. This will be the negative end of your circuit. Finally, carefully dip the free ends of both alligator clips into a cup of tap water. Make sure the clips do not touch each other and that the LED is positioned to be visible. The LED light should turn on, showing that electricity can flow through the tap water.
19. Create an index card flashlight
This DIY flashlight really turns on and off! It only takes index cards, aluminum foil, mini LED bulbs, an button cell batteries.
*What you’ll need: Mini LED bulbs, 3V button cell batteries, aluminum foil, index cards, file folder labels (to use as tape- they are stickier, easy to tear into smaller pieces and more sharable than a roll of tape)
Instructions: Straddle the LED bulb over the top of the index card and tape down, leaving a good portion of the wire uncovered. Mark on the card which side is + and which is -. Fold a piece of foil “hot dog style” about 1 inch wide and tape one end vertically to the positive wire on the card, leaving the bottom third uncovered. Next, place the button battery, positive side down onto the aluminum foil strip. Using two pieces of a file folder label, tape the battery to the index card, leaving some of the textured, negative center of the battery exposed. On the flip side of the card tape down another strip of foil over the negative wire. Let the strip of foil hang down about to double the length of the card. Flip the card over again. To light up the bulb, simply touch longer piece of aluminum foil to the battery. The circuit will be complete and the light will illuminate.
20. Make a penny battery
Use a stack of coins (the more coins you use, the more electricity produced) to make a battery.
*What you’ll need: 6–10 pennies, aluminum foil cut into small squares approximately the same size as the pennies, paper towel cut in to similar squares, salt water solution, scissors, LED light
Instructions: To begin, cut small squares of foil about the size of a penny. Cut matching squares of paper towel. Dip the paper towel squares into the salt water and wring out. Now, create stacked layers of penny, paper and foil. Repeat this sequence, in this order, several times ending with foil on top. Tip: the more layers, the stronger the battery. Next, bend the legs of the LED so it looks like the light bulb is doing the splits. Touch the longer leg to the foil on top and the shorter leg to the penny at the bottom of the stack. The light bulb will illuminate!
21. Make an electromagnet
Teach your students how an electric current can create a magnet.
*What you’ll need: One 3-4″ iron nail , 2-3 feet of insulated copper wire, 1 D-cell battery, paperclips. tape or rubber bands.
Instructions: To begin, strip both ends of the wire so the copper is exposed. Coil the wire tightly around the nail, leaving about 2 inches of wire free on both ends. The more coils, the stronger the electromagnet will be. Touch one wire to the positive end of the battery. Touch the other wire to the negative end. As soon as the circuit is complete, electricity flows through the wire, turning the nail into a temporary magnet. Dip the end of the nail into a pile of paper clips to gauge the strength of the magnet. Experiment with different variables- number of coils, tight v. loose coils, longer nail, etc.
22. Find out what conducts electricity
Figure out what objects are made of material that conducts or does not conduct electricity.
*What you’ll need: AA batteries, LED light bulbs
Instructions: Collect common objects such as a key, chalk, wood, and/or candle. Then, test each object by putting it between a battery and a light bulb and touching foil to the base of the bulb. If the bulb lights up, the object conducts electricity!
23. Create an electroscope with a soda can
An electroscope detects the presence of an electronic charge. Create a basic but effective electroscope with everyday items and put it to work.
*What you’ll need: a soda can, insulation tape, aluminum foil and a styrofoam cup
Instructions: Invert the styrofoam cup and tape the can to the top with the insulation tape. Cut two 1.5″ x .25″ strips of aluminum foil and form a hook at one end of each strip by pinching the foil together. Hang the foil hooks off of the ring pull tab on the open end of the can. Charge up a balloon and bring it near the foil strips. What happens? Variables to experiment with: Try aluminum strips of different sizes. Get the inside of the can wet and see what happens. Attach the can to a metal, ceramic, plastic or glass cup instead.
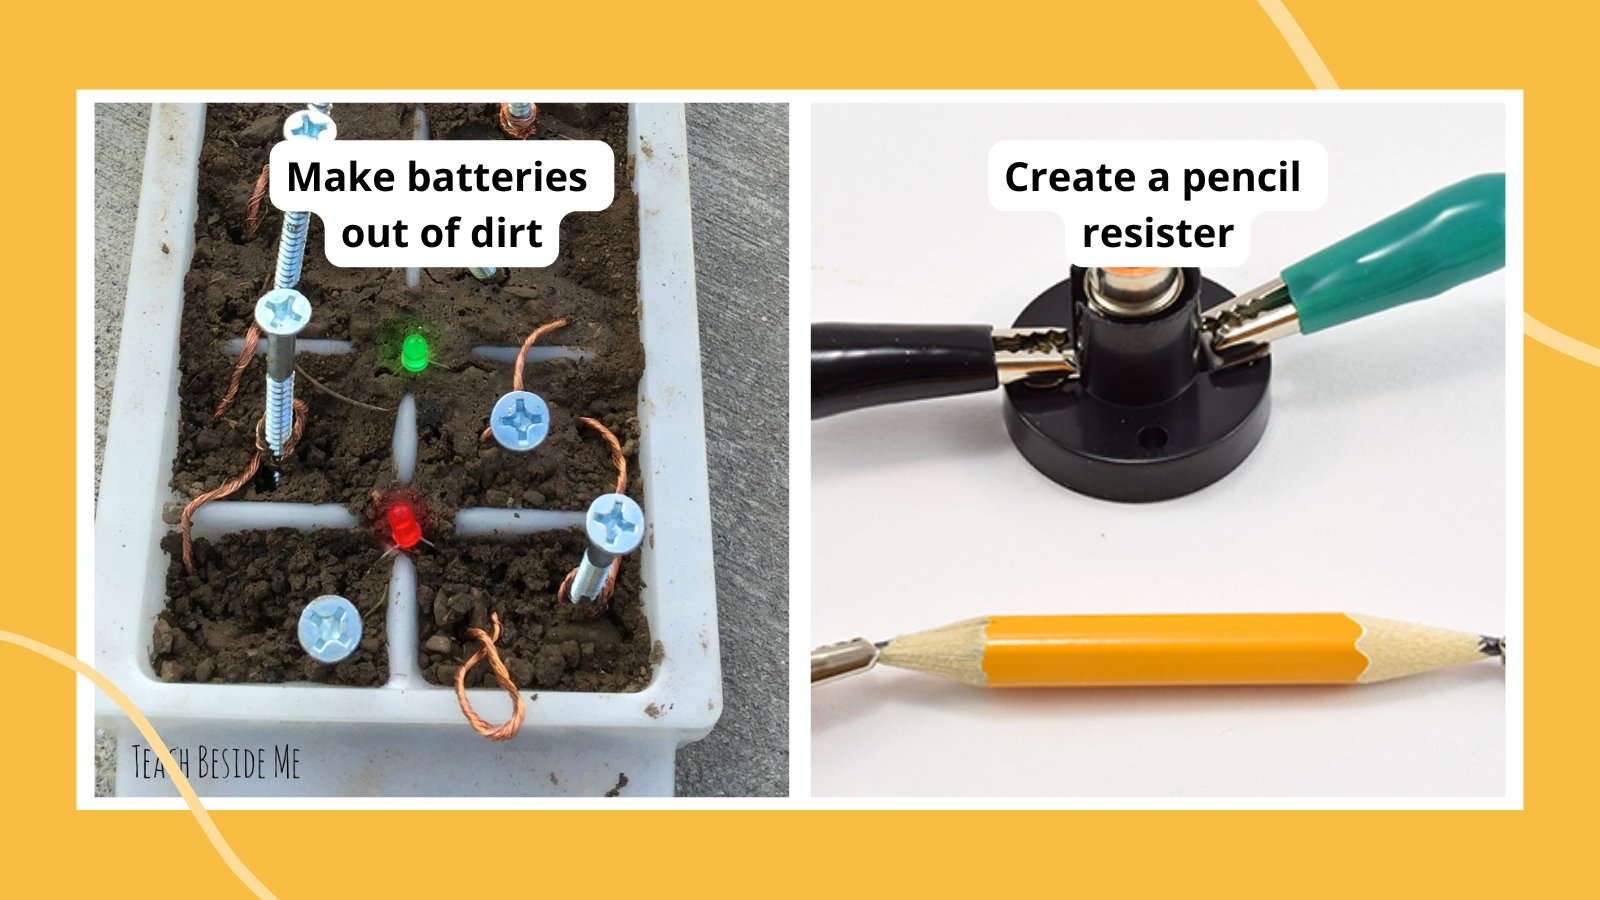
24. Turn dirt into a battery
Did you know you can even conduct electricity in dirt? Seems crazy, but it’s true.
*What you’ll need: plastic ice cube tray, copper wire, galvanized screws (very important- galvanized steel has nickel in it which acts as a conductor)
Instructions: Fill your ice cube tray with moist dirt, adding a little liquid to each cell of the tray if it is dry. (Make the dirt even more conductive by adding lemon juice or vinegar to the soil.) Picture the ice cube tray as two columns of six rows. Put a galvanized screw into each square of the ice cube tray. Cut the copper wire into 3″ pieces and twist the strands tightly together.
Starting with the second row on the first column, wrap one end of wire around each screw, poking the tail end into the soil in the cell next to it. Go all the way down column 1 and back up column 2 connecting all of the cells to one another. In the top square of column 2, wrap the copper wire around the post then give it an extra piece of wire coming out, standing up out of the soil. Push LED lights into the soil of each row, straddling the center line with the positive and negative wires and watch them light up
25. Lemon battery
Use a lemon to create a battery with coins and a multimeter. It’s a great way to show students how literally anything can be a conductor of electricity.
*What you’ll need: Multimeter, a lemon or orange, penny, nickel
Instructions: Prepare lemons and limes for your students by rolling them first to juice them up then cutting two slits (big enough to fit coins) onto the side of each fruit. Insert the penny and nickel into the slits (make sure they don’t touch each other). Touch one electrode of the multimeter to one of the coins and then the other electrode to the other coin. Read the multimeter to see how much of a charge you get. What happens if you swap electrodes from one metal to another?
26. Create an electromagnetic train
This is such a fun and easy demonstration. Show the connection between electricity and magnetism by creating a train with a battery and some neodymium magnets. One note: This is a project for older students who have close adult supervision, as neodymium magnets are very strong.
*What you need: Neodymium magnets, 18 gauge copper wire, AAA battery, wire cutters
Instructions: Stack four magnets on either end of the battery. Note: the magnets need to be placed on the battery with the poles facing opposite directions, otherwise, the train will not work. Coil the copper wire into a long tunnel. Make sure the circumference of the coil is just a bit bigger than the circumference of the battery. (We wrapped the wire around a dowel.) The longer you make the copper wire tunnel, the further the train will travel. Next, push the train (4 magnets+battery+4 magnets into the end of the coil and watch it zoom through to the other end.
27. Build a simple electric motor
This experiment involves neodymium magnets, which should only be used with older students.
What you’ll need: One AA battery, 18 gauge copper wire, 2 neodymium magnets (the circumference of the bottom of the AA battery, wire cutters, needle nose pliers, ruler, index card, tape, colored paper
Instructions: Cut a 7 inch section of copper wire. Bend a small loop in the center of the wire. Bend the wire into a U shape with the loop at the bottom of the U. Bend the top ends or the U toward each other forming a loose oblong. Attach the neodymium magnets to the negative end (bottom) of the AA battery. Now attach the wire to the battery stack so that the loop end touches the top and the bottom ends lightly curl around the disc batteries. It make take a bit of adjusting, but when the wires are properly placed, the wire will spin around the battery stack. For more, attach a drawing (an animal, a dancer, etc) on a piece of index card to the top loop and watch the picture twirl.
28. Incorporate art into your electricity unit
There are many fun art projects that can be done in conjunction with your science unit. For example, have students create a drawing— a robot, a night sky, or a greeting card—and embed a simple circuit the LED lights behind the paper to make their scene light up. Or make tin foil robots from cardboard and foil and add a simple circuit with LED lights to light up the eyes. Also, make light-up salt dough sculptures. Have students sculpt a small shape (star, animal, flower), bake it, then insert LED lights and a battery.
29. Incorporate movement into your electricity unit
Here are a few engaging movement-based activities to help students physically act out electricity concepts. Do an electron speed walk. Have students pretend to be electrons moving through a wire taped on the floor. When you call out “high resistance” students walk slowly and when you call out “low resistance” they will walk quickly. Add obstacles to the high resistance area to slow students down.
Or play an Attract or Repel tag game (kind of like Sharks and Minnows). Students wear cards with either a “+” or “-“. Opposite charges attract and a tag makes you part of a pair. When a like charge tags, it repels and the pair is broken up. So basically the two charges avoid being tagged by the opposite charge and when they are tagged, someone with the same charge can free them.
30. Music activities to incorporate into your electricity unit
Here are a couple of activities that will help your students hear and feel key concepts. Have students represent electrical current using clapping, tapping, or drumming. Perform a series circuit- one steady rhythm passed down the line. Then a parallel circuit which is multiple rhythms played simultaneously by different groups. Finally, an open circuit. Play music and have students clap along. When the music stops, a connection breaks and the clapping also stops.
Use musical dynamics to model voltage. Repeat the same pattern at different “voltages” to show how energy level changes output. Low voltage= students perform very softly. High voltage= students play loudly.