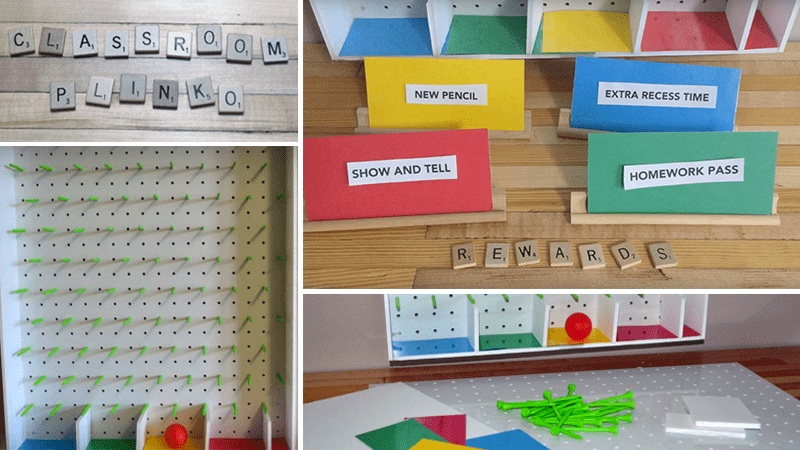
Plinko boards are a nostalgic reminder of 1980’s game show excitement. They’re fun, simple, and perfect for quick rewards and test review. As the winter sets in, indoor recess drains your last drop of sanity, and your students are tired of the same old rewards and games: here is the solution to all your blues.
What You Need
Your classroom plinko board will require a moderate level of craftiness, 2-3 hours of time, and support from the teachers’ friend Mr. Hot-Glue Gun. We found all the main supplies on Amazon, so your job just got easier!
- 18-inch x 22-inch plastic pegboard (available on Amazon)
- 20-inch x 30-inch white foam core board (available on Amazon)
- 2-inch golf tees (available on Amazon)
- Ping pong balls (available on Amazon)
- Construction paper
- Cutting board
- X-Acto knife
- Straight edge
- Hot-Glue Gun

What to Do
Step 1
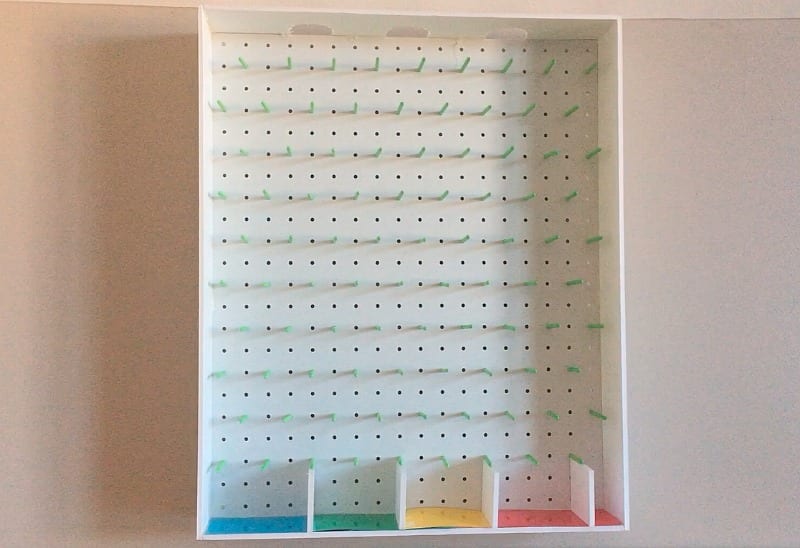
To create the board, you want to fit the golf tees snugly into the pegboard panel. I put the tees in from behind because they stayed better this way. As you go, you’ll want to create a pattern so that your ping pong ball will fall properly later on. I used this pattern:
- Row A: Three empty holes between tees up to down.
- Row B: Three empty holes between tees up to down, off set to start in the middle of row A. (Leave the bottom two holes empty across the board.)

Step 2
To create the board’s frame, you’ll cut your foam core board into strips three-inches wide to the following lengths:
- 2 strips at 22 1/2-inches (the sides)
- 2 strips at 18 inches (top & bottom)
- 2 strips at 3-inch squares (cut into triangles for corner support)
- 5 pieces at 2 ¾-inch by 2 1/8-inch (dividers at the bottom)
Step 3
Now it’s time to assemble the board. Cut three 2-inch holes in the top (b) piece for ball drop holes. Hot glue the triangle corners perpendicular to the top and bottom pieces (b); inset ¼” from either end to leave room for the sides. Then hot glue the sides (a) to the top & bottom pieces (b) to complete the frame.

Step 4
For the final assembly, drop the pegboard carefully into the foam core frame. Hot glue the board to the triangle corners to lock it into place. Then glue the dividers in place at the bottom, adding construction squares to designate different prizes and questions.
Step 5
This is the best part. Drop a ping pong ball and have fun!

I’m a kindergarten teacher, and I plan on using this in my class for student incentives and rewards. But the beauty of this project is that you can use it for anything and any age. For instance, you could color coordinate review questions for reading, math, geography, etc. Then whichever color the student gets, you ask them a question in that specific category.

Check out the video to see how it all comes together…